
One of my blogger friends once reminded me that blogging should be about sharing, not showing off. I try to follow her advice, but I’m afraid that this post might be edging over a little into showing off. I recently saw the film Julie and Julia again on TV – I really like this movie; perhaps it’s because of the nostalgia created by the movie sets of an old Paris, perhaps because it has Meryl Streep in it.
Anyway, I noticed that the last dish that ‘Julie’ had to make was a fully boned duck, stuffed and baked in a fancy pastry crust – Pâté de Canard en Croûte. This dish was a major achievement for her – not only it was the last of the 365 dishes she had to create over the year, but she had to overcome the hurdle of preparing a complicated dish.
I, too, then decided to leap to the challenge of making Canard en Croûte. At first, I thought this dish might be too ‘fiddly’, but then again it would be good practice for me- in three months I’m off again to Le Cordon Bleu school in Paris to do the advanced cuisine course! Was this dish worth it? Was it worth the many hours spent in the kitchen and dropping my knife several times on my foot? Read to the end of this post and see!
(P.S. If you enjoyed this post, please do ‘like’ my G’day Souffle’ Facebook page!)
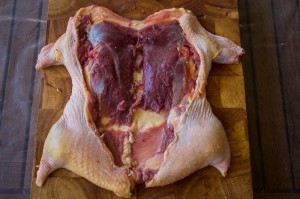
The first steps to making the dish involve removing all the bones of the duck, leaving the skin in tact. It’s important to start with a positive ‘can-do’ attitude- remember that you are master of the duck!
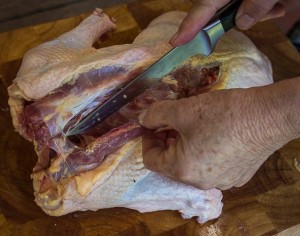
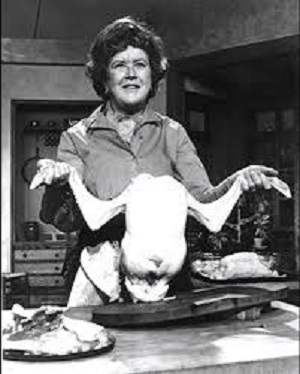 To bone the duck, start with the back of the duck facing upwards. First you cut a deep slit down one side of the backbone (going from neck to tail), pulling the flesh away from the carcass using your fingers.
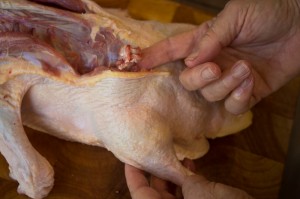
As your knife reaches the ball joint of the thigh, you find that you’ve hit a roadblock. You now need to sever or ‘snap’ the joint using your fingers and you can now slice to the end of the backbone.
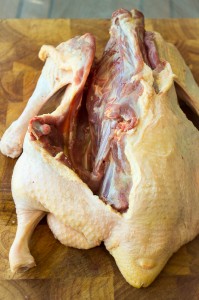
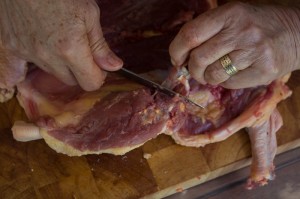
Now repeat this process on the other side of the back bone. You will now see a fully exposed back bone with the ribs attached- cut away this part of the carcass to tidy things up and make it more manageable to handle the remaining carcass. Next you cut very close to the ridge of the breastbone to free the carcass, being careful not to cut the skin. Once the carcass is fully released, you’re not done yet! There are still the bones to remove from the wings and thighs. To remove the bone from the thighs, scrape the meat from the bone going from the ball joint to the tip of the thigh. Repeat with the wings.
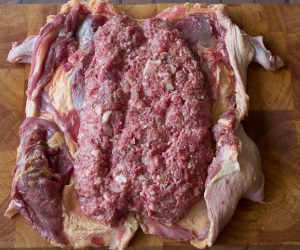
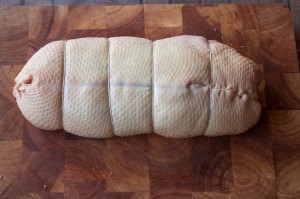
At some point, Julia warns us that the whole duck carcass with dangling legs, etc will appear to be an unrecognizable mass of confusion and therefore we should not be overcome with fright. Several times, I had to remind myself to put on my ‘Julia hat’ and fill myself with confidence. Yes, I can bone six ducks if I wanted to! 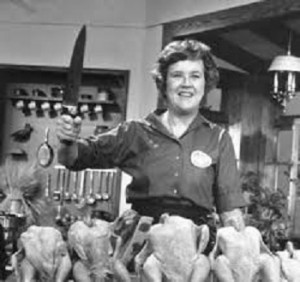 After boning the duck, you are left with an empty ‘duck suit,’ ready to be stuffed, then rolled and stitched up into a loaf shape.
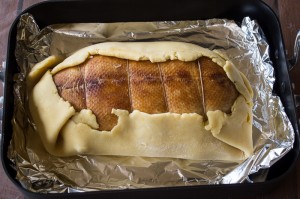
Next, you brown the duck in oil on the stovetop. Prepare a chilled pastry dough and roll 2/3 of it out into an oval shape (1/8 inches thick). Place the browned duck on top of the dough with the breast side facing up and bring the pastry up around the duck, patting it into place.
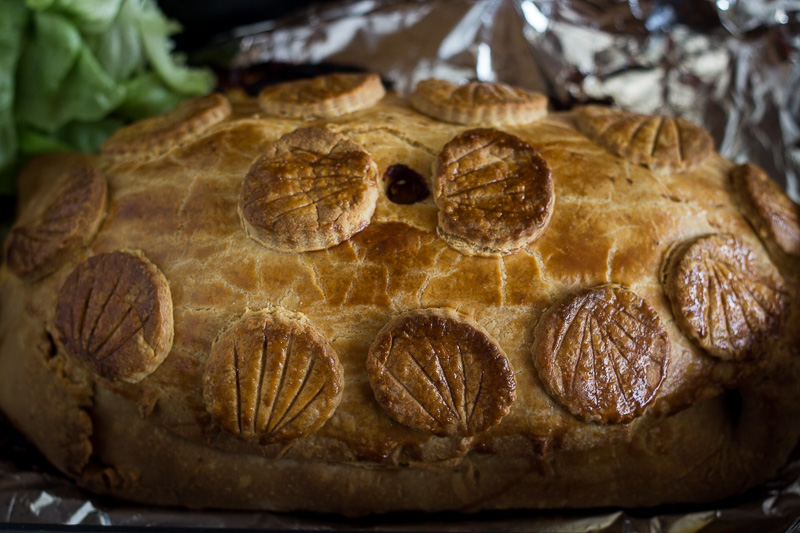
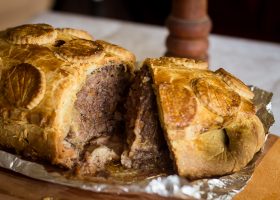
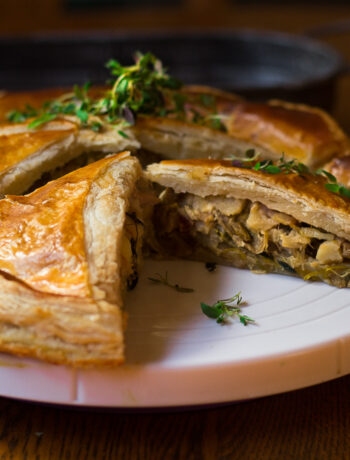
Roll out the remaining pastry into an oval shape and place it on top of the duck. Brush pastry top with egg wash. Cut out small pastry decorations using a cookie cutter, using back of knife to press fan-shaped lines into them. Coat them also with the egg wash. Bake for 1.5 to 2 hours at 350 F (180 C). Julia recommends serving the dish chilled, but you can also serve it hot. 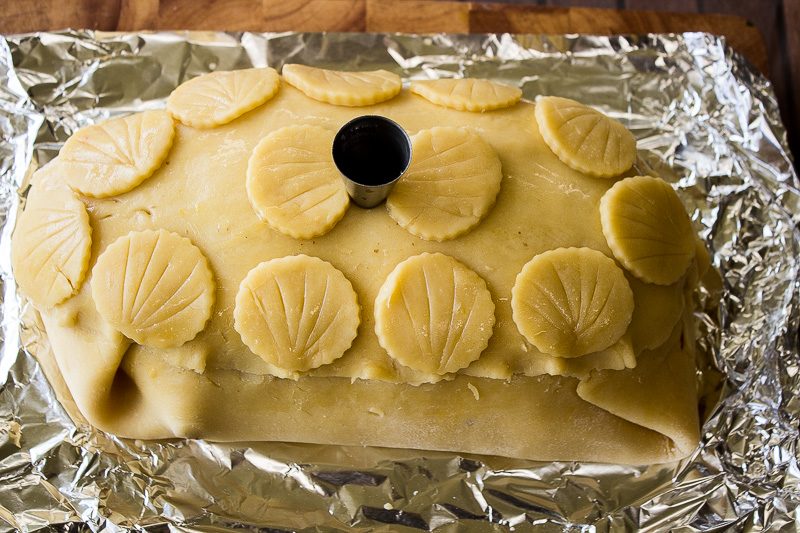 Before serving, you’ll need to lift the top crust off and remove the duck, to cut all of the trussings. Place the duck back into the pastry to serve.
But was it worth it? Julia Child gave people the confidence to toss out their TV dinners and to get into the kitchen to cook- even complicated things like Pâté de Canard en Croûte. I accepted the challenge and happily succeeded! This dish is indeed an impressive sight when you bring it to the dinner table! So, yes, it was worth it. But bones are what give meat dishes their juicy flavor – so why remove them? And there are other duck dishes that are more delicious and simpler to prepare (see my Duck Breast in Orange Sauce). So, yes, with this dish Canard en Croûte, I admit I was showing off a bit, but probably I won’t be doing it again! It will be back to my ‘blogging is sharing’ once more.
PrintBoned Duck Baked in Pastry
- Yield: 6 1x
Ingredients
- 1 duck
- salt/pepper
- 2 tbsp. cognac
- 2 tbsp. port
- For the stuffing
- 1/2 cup mined onion
- 2 cloves chopped garlic
- 2 Tbsp butter
- 1/2 cup port or cognac
- 1 1/2 cups each minced pork and veal
- 1 cup minced pork fat
- 2 lightly beaten eggs
- salt and pepper to taste
- 1/2 tsp thyme
- t tbsp orange zest
- 1/2 cup chopped walnuts
- For the pastry dough
- 5 cups all-purpose flour
- 2 1/2 cups chilled butter, cubed
- 1 tbsp. salt
- 2 eggs
- about 1/2 cup cold water
Instructions
- Cut the wings of the duck at the first joint and bone the duck as per the instructions (above). Lay the bird skin-side down on a cutting board. Slice off some of the thickest parts of the meat from the duck breast and thigh meat and cut into cubes. Place the cubes back onto the duck, season with salt and pepper and sprinkle with the cognac and port. Roll the duck up and place in fridge while preparing the pastry and stuffing.
- For the stuffing, cook the diced onion and garlic slowly in butter until they are tender and translucent. Transfer to large mixing bowl and add the port and cognac, minced pork, veal and pork fat. Add the eggs, salt, pepper, thyme, orange zest and chopped walnuts and mix well.
- To prepare the dough, place the flour and salt in a large mixing bowl. Add the chilled, cubed butter; rub the flour and butter together between the palms of your hands until it resembles fine sand. Add the eggs and mix with a wooden spoon. Add enough cold water so the dough easily holds it shape when formed into a ball. Turn the dough mixture out onto your work surface and knead several times until the dough forms a cohesive ball. Wrap with plastic wrap and place in fridge to chill for at least 15 minutes.
- Remove the duck from the fridge. Place the duck skin-side facing down on a work surface. Place enough stuffing inside the duck to cover the center part. Fold both sides inward toward the center and stitch up the opening using kitchen string and a trussing needle. Wrap and tie the string around the duck in 4 – 5 places to hold it together while cooking. Heat several tablespoons of oil in a large casserole dish or saucepan and brown the duck on all sides; let cool for several minutes
- Remove dough from fridge. Roll out 2/3 of the dough into an oval shape on a floured surface. Place the trussed duck on top of the dough, with the breast side facing up. Bring the edges of the dough up around the duck and pat into place. Roll out the remaining dough into an oval shape and place on top of the bottom crust. Pinch or press the edges of the top and bottom crusts together. Brush the top crust with an egg wash. Roll out the remaining pastry dough and cut out small round or oval shapes using a cookie cutter. Use the back of a knife to press fan-shaped lines into them. Decorate the top crust with these shapes. Brush the entire top crust and pastry decorations with egg wash. Place a foil funnel or piping nozzle in the center of the pastry to let out steam during baking.
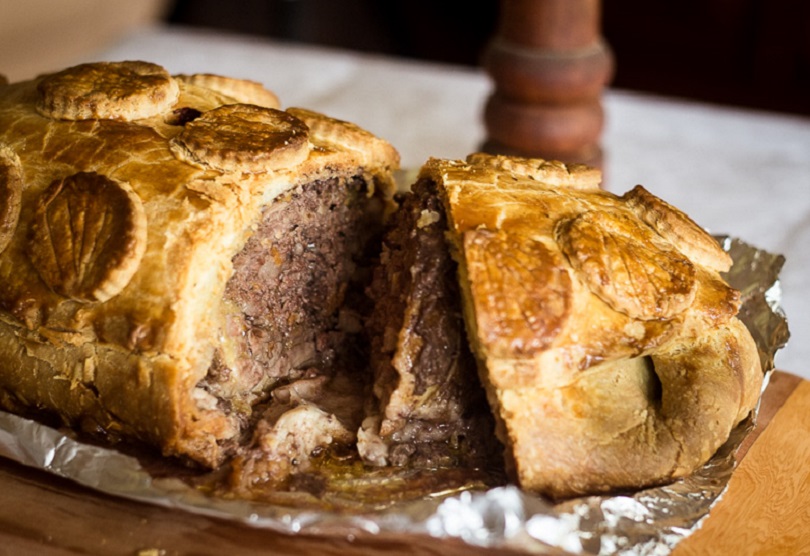
- Bake for 1.5 to 2 hours at 180 C or 360 F. Remove from oven and let cool. Lift the top crust gently off and lift out the duck. Cut off the trussings, place the duck back inside the pastry and replace the top crust. Serve either cold or warm.

25 Comments
John@Kitchen Riffs
March 26, 2014 at 4:19 amI’ve always wondered about this dish, whether the flavor payoff was worth the trouble. Although I love pastry, I’ve never been a big fan of some of the meat dishes that are baked in it (Beef Wellington, for example; meat pies are different, however). Anyway, glad you did this so I don’t have to! I have a duck in the freezer that I need to use, and this recipe actually crossed my mind, although I pretty quickly rejected it. Looks great and sounds like it tastes pretty good; but there are better options. Fun post — thanks.
Fran
March 26, 2014 at 7:32 amThank you so much for your comment. This dish/post took me two days to prepare so I am really thankful or your comment, John!
Joanne T Ferguson
March 26, 2014 at 10:49 amG’day and WOW Fran; very labor intensive, but looks delicious!
I used to watch Julia in black and white when I was little too!
Well done! Looks great!
Cheers! Joanne
Fran
March 26, 2014 at 11:35 amThank you, Joanne. Actually I wasn’t too aware of Julia Child until the movie came out several years ago!
Juliana
March 26, 2014 at 11:14 amWow…I have never had this dish…thanks for introducing me to it…this looks fabulous and you just made it so pretty…I love all the pictures. I am very impressed Fran.
Have a wonderful week 😀
Fran
March 26, 2014 at 11:37 amThanks, Juliana for your comment!
Kumar's Kitchen
March 26, 2014 at 3:42 pmwe just love learning recipes from your blog…they are so perfect…thanks for the inspiration our friend…HAVE A BEAUTIFUL DAY!!! 🙂
★★★★★
Fran
March 29, 2014 at 9:01 pmThank you- it’s you who inspire me with your nice comments!
Allan
September 27, 2020 at 1:22 amHi – I am thinking about attempting this, but I’m wondering how greasy the whole thing becomes, what with the duck skin being inside a pastry shell. I was thinking of removing the skin entirely, OR doing it in the skin without the pastry. Thoughts?
Fran Flint
September 27, 2020 at 2:22 amHi Allan, thanks for your comment.I don’t find this dish to be too greasy or fatty. After you brown the skin and stuffing together (after being trussed and rolled up together), the fat from the skin has pretty well ‘drained off.’ The inside of the duck dish is rather soft and creamy- sort of like a very flavorful meatloaf! If you remove all of the skin beforehand, you won’t have anything to gold the stuffing together. I recommend trying it as the recipe is written- it’s a bit of an adventure!
Kirsten
April 21, 2021 at 7:13 pmHi, lovely recipe. I work as a doctor and used a scalpel to debone the duck. It was so much easier than every other time I’ve tried. Lesson to me that sharp knives are a winner but i will always use a scalpel from now. Takes all the hard work out.
Fran Flint
April 22, 2021 at 9:06 amThanks Kirsten- Now I’ll have to buy a real scalpel for the duck de-boning!
Maureen | Orgasmic Chef
March 26, 2014 at 10:46 pmHoly cow, Fran! I LOVE it when you show off!! How else are we all going to be challenged to better if people like you don’t show the way. 🙂
This looks outstanding!
★★★★★
Minnie@thelady8home
March 27, 2014 at 7:15 amYour end lines cracked me up…I am honestly not a fan of labor intensive dishes, especially when I can better ones at 1/4 th of the trouble. But if someone else makes it and treats me to it…I would never say no. I don’t mind adding ingredients in a pan and swirling them around, but I get allergic the moment multiple sessions of chopping, gringding, heating, tying baking is concerned…Which is why I love it when people share simple dishes. But this does look fabulous, and I must say, I am immpressed.
★★★★★
Daniela
March 30, 2014 at 7:49 amOMG Fran I admire you that you achieved this challenge.
I probably never will, but it was fun and interesting to read your post and then- I think I’ll stick to your duck breast in orange sauce 🙂
The Hungry Mum
March 30, 2014 at 5:10 pmwow – what a snazzy looking meal! I don’t have the talent for this.
Anneli Faiers
March 30, 2014 at 10:28 pmI am impressed indeed! Nothing wrong with a bit of showing off! It looks so technical…I would be a little scared. And I am not sure it is a dish for me. I am not a fan of things in pastry as I find them a bit heavy. And I prefer my duck very pink and I guess that is harder to control cooking it this way. None the less, to have mastered a ‘Julia’ classic is a worthy achievement. xx
Claire @ Simply Sweet Justice
May 9, 2014 at 2:27 amWOW! What an exquisite dish. Thank you for sharing!
Chris Savage
May 8, 2015 at 1:14 pmFran looks great. I have never made it with pastry and you have inspired me to try it. Boning a duck/chicken and stuffing it as a log coated in some sort of sticky glaze has been a standby of mine since I first practiced on a chicken when I was 12. I probably use it at least a couple of times a year and as I am nearing 50 you can probably guess I have got a lot better at boning!
You say why do it when the bones give flavour. Well a duck will feed 4 to 6 people at a dinner party where the roll will slice to feed at least double that so it is an economical way of having an expensive meat stretch to feed a crowd without losing the wow factor. When money is tight but you love entertaining it is a great way of balancing the dinner party budget.
★★★★★
Fran
May 8, 2015 at 1:35 pmThanks, Chris, for your comment. This dish is definitely a nice ‘show-off’ recipe for your guests. By cooking the duck without the bones, you lose some flavour, however this can be compensated for by adding the seasonings and pork fat. I agree- you can certainly feed a lot of people with this recipe!
Janice
May 20, 2015 at 1:18 pmWhat do you eat with it??…
Aaron
December 28, 2016 at 3:37 amI made this dish for Christmas this year and it turned out very well. However, it seems like there is no indication in the written instructions at the bottom of whether or not to brown the duck before enfolding it en croute. In the pictorial directions it shows the duck browned first. Please clarify. I opted to brown the duck first. Is it necessary?
★★★★
Fran
December 28, 2016 at 3:59 amAaron, thanks so much for your comment and I’m glad your duck turned out well (reminds me that I should try to make this dish again soon)! Yes, the written directions should say to brown the duck first- I have now updated the written instructions to reflect this.
Gerie
October 7, 2019 at 3:55 amhi, I tried to do this today and it almost worked. I lost patience (and energy) to fully debone the wings so cheated a bit and chopped off the thin bits.. :). I also didn’t make the pastry but instead just roasted the duck plus filling in the oven, and it was very delicious, I was surprised how creamy the meat was and how well it sliced. My question is: what happens to the duck skin when you bake it inside pastry? does it stay very soft/fatty? thanks a lot.
★★★★
Fran Flint
October 7, 2019 at 10:38 amHi Gerie- thanks so much for stopping by my blog! It’s true that it’s very time intensive making Julia’s recipe- I try to spread the process over several days so that I won’t ‘give out’. Yes, when you bake the stuffed duck inside the pastry, the skin stays soft. Baking it in the pastry helps to give a nice buttery, finishing touch to the dish. Hope you can make it again with the pastry!